지난 시간 리뷰
JETPACK COMPOSE: 영화 앱 만들기 - 2, Navigation Component, Scaffold, LazyColumn, Passing Data Between Screens, Coil
지난 시간 리뷰 JETPACK COMPOSE: 영화 앱 만들기 - 1, Navigation Component, Scaffold, LazyColumn, Passing Data Between Screens JETPACK COMPOSE: 영화 앱 만들기 - 1, Navigation Component, Scaffold, Lazy..
mypark.tistory.com
안녕하세요~ 지난 시간에는 영화 이미지를 가져오고 LazyColumn을 만들고 Navigation Component로 이동하는 방법을 배웠습니다.
이번 시간에는 노트 앱을 만들어 보면서 ViewModel, Android ROOM, DI, Hilt & Dagger, Coroutine에 대한 개념에 대해 살펴볼 예정입니다.

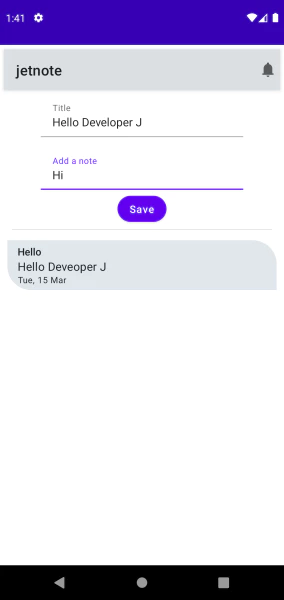
Title과 Add note에 글을 쓰고 Save를 누르면 아래 부분에 리스트 형태로 저장이 되게 하는 앱입니다!
우선 Top 부분을 만들어 봅시다!
Top부분은 TopAppBar를 통해 만들어왔었는데 기억이 안나시는 분은 아래 링크를 참고 부탁드립니다.
JETPACK COMPOSE Scaffold 정리
Jetpack Compose는 Android 프로그래밍의 미래가 될 수 있습니다! 대부분의 기능과 컴포저블(Composable)은 사용하기 쉽고 이해하기 쉽습니다. 또한 엄청난 수의 속성을 가지고 있습니다. 이번 시간에는 Sc
mypark.tistory.com
우선 Column형태로 저장이 되어야 하기 때문에 TopAppBar를 Column안에 넣어줍니다.
package com.example.jetnote.screen

import ...

@Composable
fun NoteScreen() {
    Column(modifier = Modifier.padding(6.dp)) {
        TopAppBar(title = {
            Text(text = stringResource(id = R.string.app_name))
        },
        actions = {
            Icon(imageVector = Icons.Rounded.Notifications,
                contentDescription = "Icon")
        },
        backgroundColor = Color(0xFFDADFE3)
        )
    }
}

@Preview
@Composable
fun NotesScreenPreview() {
    NoteScreen()
}
Text를 기존과는 다른 방법으로 stringResource에서 id를 R.string.app_name으로 넣어줍니다. (xml 방식에 익숙하신 분은 익숙한 방법)
res/values/strings.xml에 가보면 아래와 같은 app_name이 선언되어 있습니다. (프로젝트 이름과 동일하게 생성됨)
<resources>
    <string name="app_name">jetnote</string>
</resources>
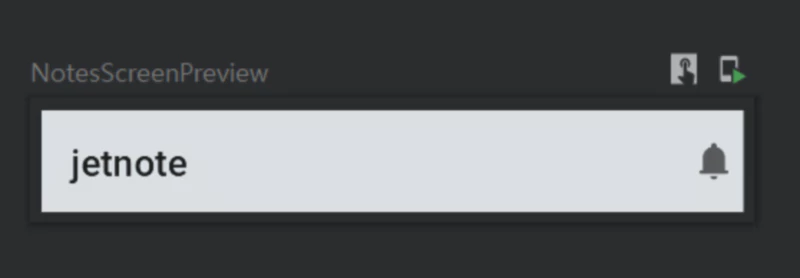
아래와 같이 맨 오른쪽에 종으로 된 아이콘이 생성되고 app_name에 있던 jetnote가 왼쪽에 배치되는 것을 볼 수 있습니다.
이제 title과 Add a note 부분을 만들어 봅시다.
title과 Add a note는 공통점이 많아보입니다.
하나의 함수로 만들 수 있는 방법이 있을 것 같습니다.
jetnote의 components를 만들고 그 안에 새로운 NoteComponents.kt파일을 만듭니다.
이 안에 NoteInputText라는 함수를 만들어 봅시다.
아래 함수는 @Composable이고 표시할 Text와 label을 받고 얼마까지 저장할 string을 받을지 제한을 거는 maxLine과 입력된 text가 달라졌을 때 동작시키는 onTextChange, 그리고 onImeAction을 받습니다.
Android ImeAction.Compaion 정리
object ImeAction.Companion Public properties Default val Default: ImeAction 플랫폼 및 키보드 기본값을 사용하고 키보드가 Action을 결정하도록 합니다. 키보드는 대부분 단일/다중 라인 구성을 기반으로 D..
mypark.tistory.com
package com.example.jetnote.components

import ...
@ExperimentalComposeUiApi
@Composable

fun NoteInputText(
    modifier: Modifier = Modifier,
    text: String,
    label: String,
    maxLine: Int = 1,
    onTextChange: (String) -> Unit,
    onImeAction: () -> Unit = {}
) {
    val keyboardController = LocalSoftwareKeyboardController.current
    TextField(
        value = text,
        onValueChange = onTextChange,
        colors = TextFieldDefaults.textFieldColors(
            backgroundColor = Color.Transparent),
        maxLines = maxLine,
        label = { Text(text = label)},
        keyboardOptions = KeyboardOptions.Default.copy(
                imeAction = ImeAction.Done),
        keyboardActions = KeyboardActions(onDone = {
            onImeAction()
            keyboardController?.hide()
        }),
        modifier = modifier
    )
}
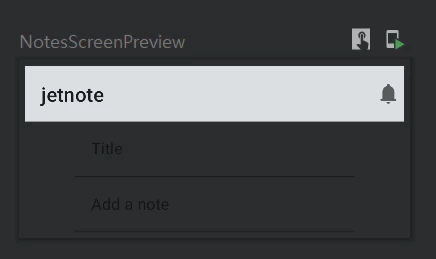
NoteScreen에서는 Column안에 NoteInputText를 두 번 부르는데 하나는 text에 title을 넣고 하나에는 description을 넣어 줍니다. 각각 label에도 "Title", "Add a note"를 넣어주면 됩니다.
title과 description을 by remember로 만들어서 해당 문자가 update가 되면 화면이 update 되도록 합니다.
@ExperimentalComposeUiApi
@Composable
fun NoteScreen() {
    var title by remember {
        mutableStateOf("")
    }
    var description by remember {
        mutableStateOf("")
    }
    Column(modifier = Modifier.padding(6.dp)) {
        TopAppBar(title = {
            Text(text = stringResource(id = R.string.app_name))
        },
        actions = {
            Icon(imageVector = Icons.Rounded.Notifications,
                contentDescription = "Icon")
        },
        backgroundColor = Color(0xFFDADFE3))
        //Content
        Column(modifier = Modifier.fillMaxWidth(),
            horizontalAlignment = Alignment.CenterHorizontally) {
            NoteInputText(text = title, label = "Title",
                onTextChange = {})
            NoteInputText(text = description, label = "Add a note",
                onTextChange = {})
        }
    }
}
이제 아래 Save 버튼을 만들어 봅시다.

Save 버튼도 동일하게 NoteComponents.kt에 함수를 만들면 됩니다.
Button을 만들고 그 안에 Text를 만드는데 해당 text는 함수 호출 부분에서 정하도록 합니다.
Button에서 중요한 것은 onClick인데 이것도 위에서 결정할 수 있도록 합니다. (버튼이 눌렸을 때 어떤 일을 할지)
@Composable
fun NoteButton(
    modifier: Modifier = Modifier,
    text: String,
    onClick: () -> Unit,
    enabled: Boolean = true) {
    Button(onClick = onClick,
        shape = CircleShape,
        enabled = enabled,
        modifier = modifier) {
        Text(text = text)
    }
}
호출된 하는 곳에서 NoteInputText부분 아래 NoteButton을 작성하고 text에 "Save"를 넣어주면 됩니다.
onClick은 이후에 구현할 예정입니다.
//Content
Column(modifier = Modifier.fillMaxWidth(),
    horizontalAlignment = Alignment.CenterHorizontally) {
    NoteInputText(
        modifier = Modifier.padding(
            top = 9.dp,
            bottom = 8.dp),
        text = title, label = "Title",
        onTextChange = {})
    NoteInputText(
        modifier = Modifier.padding(
            top = 9.dp,
            bottom = 8.dp),
        text = description, label = "Add a note",
        onTextChange = {})

    NoteButton(text = "Save",
        onClick = {"TODO"} )
이제 text를 입력하면 화면에 표시되도록 수정을 해봅시다.
//Content
Column(modifier = Modifier.fillMaxWidth(),
    horizontalAlignment = Alignment.CenterHorizontally) {
    NoteInputText(
        modifier = Modifier.padding(
            top = 9.dp,
            bottom = 8.dp),
        text = title, label = "Title",
        onTextChange = {
            if (it.all { char ->
                    char.isLetter() || char.isWhitespace()
                }) title = it
        })
    NoteInputText(
        modifier = Modifier.padding(
            top = 9.dp,
            bottom = 8.dp),
        text = description, label = "Add a note",
        onTextChange = {
            if (it.all { char ->
                    char.isLetter() || char.isWhitespace()
                }) description = it
        })

    NoteButton(text = "Save",
        onClick = {"TODO"} )
바로 이 부분이 핵심인데요. it은 바로 전체 string을 받는 것이고 all 람다 함수를 통해 전체 char를 돌면서
isLetter() => "이 문자가 문자인 경우에 true를 리턴합니다"
isWhitespace() => "유니 코드 표준에 따라 문자가 공백인지 여부를 결정합니다. 문자가 공백이면 true를 리턴합니다."
if (it.all { char ->
        char.isLetter() || char.isWhitespace()
    }) description = it
그래서 두 가지 조건중 하나를 만족하면 그 문자 it을 description에 저장합니다.
그렇게 되면 화면의 description이 업데이트됩니다.

이제 Save를 하면 생기는 아래 노트 부분을 만들어 봅시다.
일단을 test를 위해 임시로 메모를 만들어봅시다.
Note를 저장할 class를 따로 만들어봅시다.
Kotlin은 data class라는 것을 제공하는데요. data class에 대해 잘 모르시는 분은 아래 글을 참고해주세요.
Kotlin Data Classes 정리
Kotlin은 반복적인 코딩을 줄입니다. Class 매커니즘은 상당한 양의 작업을 수행합니다. 그러나 주로 데이터를 보유하는 클래스를 생성하려면 여전히 상당한 양의 반복 코드가 필요합니다. 본질적
mypark.tistory.com
data class Note는 아래 매개변수를 갖습니다. id는 java의 randomUUID() 생성을 하여서 고유한 키 값을 갖게 합니다.
title, description은 작성된 title과 description을 저장하게 되고, entryData는 작성된 시간을 저장하기 위한 변수입니다.
package com.example.jetnote.model

import java.time.LocalDateTime
import java.util.*

data class Note(
    val id: UUID = UUID.randomUUID(),
    val title: String,
    val description: String,
    val entryDate: LocalDateTime = LocalDateTime.now()
)
이제 이러한 Note들을 저장할 공간을 마련해봅시다.
Note가 여러 개가 될 수 있기 때문에 Note를 저장할 수 있는 공간이 필요합니다.
이 공간을 일단은 NotesDataSource라는 class로 만들어 봅시다.
loadNotes()에 List<Note> 유형을 리턴하는데 일단은 정해진 list를 리턴하도록 Note들을 생성해 봅시다.
일단 10개의 Note를 생성하였습니다.
package com.example.jetnote.data

import com.example.jetnote.model.Note

class NotesDataSource {
    fun loadNotes(): List<Note> {
        return listOf(
            Note(title = "A good day", description = "We went on a vacation by the lake"),
            Note(title = "Android Compose", description = "Working on Android Compose course today"),
            Note(title = "Keep at it...", description = "Sometimes things just happen"),
            Note(title = "A movie day", description = "Watching a movie with family today"),
            Note(title = "A movie day", description = "Watching a movie with family today"),
            Note(title = "A movie day", description = "Watching a movie with family today"),
            Note(title = "A movie day", description = "Watching a movie with family today"),
            Note(title = "A movie day", description = "Watching a movie with family today"),
            Note(title = "A movie day", description = "Watching a movie with family today"),
            Note(title = "A movie day", description = "Watching a movie with family")
        )
    }
}
NoteRow라는 함수를 만들고 이곳에 modifier와 note, 그리고 Note가 클릭되었을 때 수행할 동작을 받는 람다 함수를 매개변수로 받습니다.
note는 출력할 note가 됩니다.
아래 Text 부분에서 title과 description 그리고 entryDate를 출력합니다.
entryDate.format()을 통해 Date를 어떻게 표기할지를 정할 수 있습니다.
@Composable
fun NoteRow(
    modifier: Modifier = Modifier,
    note: Note,
    onNoteClicked: (Note) -> Unit){
    Surface(
        modifier
            .padding(4.dp)
            .clip(RoundedCornerShape(topEnd = 33.dp, bottomStart = 33.dp))
            .fillMaxWidth(),
            color = Color(0xFFDFE6EB),
            elevation = 6.dp) {
        Column(
            modifier
                .clickable { }
                .padding(
                    horizontal = 14.dp,
                    vertical = 6.dp
                ),
            horizontalAlignment = Alignment.Start) {
            Text(text = note.title,
                style = MaterialTheme.typography.subtitle2)
            Text(text = note.description,
                style = MaterialTheme.typography.subtitle1)
            Text(text = note.entryDate.format(DateTimeFormatter.ofPattern("EEE, d MMM")),
                style = MaterialTheme.typography.caption)
        }
    }
}
호출 부에서는 Divider를 써서 Save와 Note 중간에 일정한 공백을 줍니다.
그리고 LazyColumn을 사용하여 notes 즉 저장되어 있던 note들을 items로 넘겨주어 NoteRow를 통해 note들 전체를 하나씩 넘겨주어 화면에 출력하게 합니다.
//Content
Column(modifier = Modifier.fillMaxWidth(),
    horizontalAlignment = Alignment.CenterHorizontally) {
    NoteInputText(
        modifier = Modifier.padding(
            top = 9.dp,
            bottom = 8.dp),
        text = title, label = "Title",
        onTextChange = {
            if (it.all { char ->
                    char.isLetter() || char.isWhitespace()
                }) title = it
        })
    NoteInputText(
        modifier = Modifier.padding(
            top = 9.dp,
            bottom = 8.dp),
        text = description, label = "Add a note",
        onTextChange = {
            if (it.all { char ->
                    char.isLetter() || char.isWhitespace()
                }) description = it
        })

    NoteButton(text = "Save",
        onClick = {
            if (title.isNotEmpty() && description.isNotEmpty())
            {
                //save/add to the list
                title = ""
                description = ""
            }
        })
}
Divider(modifier = Modifier.padding(10.dp))
LazyColumn {
    items(notes) { note ->
        NoteRow(note = note,
            onNoteClicked = {})
    }
}
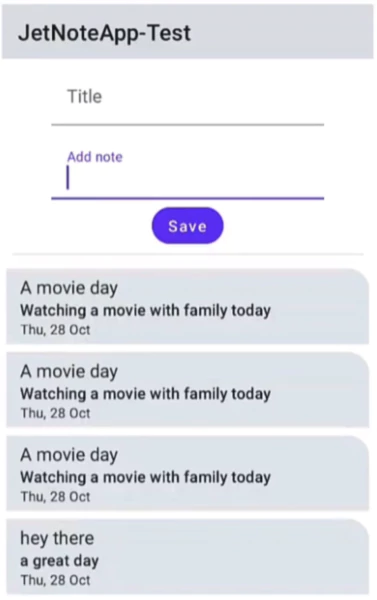
이제 아래 note에 해당하는 것들이 LazyColumn 형태로 나오는 것을 볼 수 있습니다.
잘린 부분은 아래로 스크롤을 하면 변경되게 됩니다.
이제 Note를 저장하고 지우는 것을 완전히 구현해 봅시다.
NoteScreen에 넘겨주는 onAddNote와 onRemoveNote를 구현하면 되는데요.
fun NoteScreen(
    notes: List<Note>,
    onAddNote: (Note) -> Unit,
    onRemoveNote: (Note) -> Unit,
NoteScreen은 MainActivity에서 호출하는 것이기 때문에 이 부분에서 구현을 해줍니다.
아까는 notes에 NotesDataSource.loadNotes()를 넣어서 저장된 Note를 불러왔었습니다.
지금은 그냥 mutableStateListOf<Note>라는 빈 Note를 생성합니다.
onAddNote에는 Kotlin문법인 add를 하여 it(Note)를 list에 넣어줍니다.
onRemoveNote에는 Kotlin문법인 remove를 하여 it(Note)를 list에서 삭제합니다.
@ExperimentalComposeUiApi
class MainActivity : ComponentActivity() {
    override fun onCreate(savedInstanceState: Bundle?) {
        super.onCreate(savedInstanceState)
        setContent {
            JetnoteTheme {
                // A surface container using the 'background' color from the theme
                Surface(
                    modifier = Modifier.fillMaxSize(),
                    color = MaterialTheme.colors.background
                ) {
                    val notes = remember {
                        mutableStateListOf<Note>()
                    }
                    NoteScreen(notes = notes,
                            onAddNote = {
                                notes.add(it)
                            },
                            onRemoveNote = {
                                notes.remove(it)
                            })
                }
            }
        }
    }
}
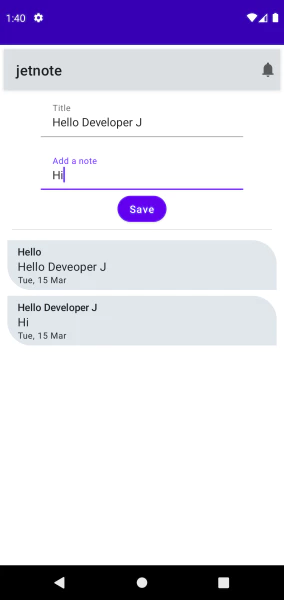
이렇게 하면 아래와 같이 Save를 할 때 위에서 봤던 메모처럼 순서대로 저장이 됩니다.
Note칸을 클릭하면 Note가 지워지는 것을 확인할 수 있습니다.
이러한 구현은 간단하지만 note들을 저장해 둘 수가 없고 매번 초기화된 note로 시작하게 됩니다.
또한 note를 다른 곳에서 이용하기가 쉽지 않습니다.
note를 MainActivity에서만 관리하기 때문입니다.
"class NotesDataSource" 형태에서는 여러 곳에서 class를 불러와 note들을 다양한 곳에서 사용할 수 있습니다.
다음 시간에는 이러한 data구조에 대해서 어떻게 구현하면 좋을지 살펴보겠습니다.
감사합니다.


댓글